
CROISSANTS !!!! Patience, Patience and Patience !!!! and Practice, Practice and Practice !!!!
I felt in love with Croissants first time on a flight when I got to have it for the first time. That was the moment I decided that one day I will make them for myself and enjoy to the fullest. Second time, my decision got even stronger when I had them again in Goa and then at Movenpick, Makkah. In India, its very hard to get the perfect classic French croissants anywhere and 3 days ago was the day when my sixth attempt came out the best of all. It gave me the highest level of satisfaction and my happiness had no limits when I saw them so beautiful and crispy from outside & extremely soft and flaky within. Not surprising to me at all, now even my kids are fond of them, they had them for their breakfast and even for lunch today. They all were polished off in a blink of an eye..
Here I go in detail describing the steps in making it......


INGREDIENTS:-
For Detrempe dough
All purpose flour……………………………………………………………… 500 gms (Extra flour will be needed for kneading and flouring surfaces)
Yeast……………………………………………………………………….... 12 gms
Milk………………………………………………………………………..…. 1 cup
Butter…………………………………………………………………….…… 3 tbsp (melted)
Sugar…………………………………………………………………………. 2 tbsp
Salt……………………………………………………………………………. 1 tsp
Warm water…………………………………………………………………... As required for kneading.
For beurrage block (Butter)
Butter…………………………………………………………………………. 255 gms (Chilled)
For egg wash
Egg white…………………………………………………………………….... 1 nos
Water…………………………………………………………………………. 1 tsp


METHOD:-
DAY 1

Detrempe dough
In a bowl, add warm milk (Such that the heat of it is bearable to the finger), sugar and melted butter. Stir till sugar dissolves well. Sprinkle yeast over it, stir well and keep it aside till it gets frothy(For around 5 to 7 minutes).
In a large bowl, mix salt and flour. Now add, yeast milk mixture and half cup of warm water. Start kneading the dough. Add ¼ cup of warm water again and knead till the dough is sticky (May require some more warm water but do not add all at once). If the dough is too soft and too sticky, you may want to add some more flour.
Transfer the sticky dough on a floured surface and knead it well with the heels of your hand till the dough becomes smooth and gets the consistency of medium softness (It should neither be too hard nor too soft) If you are using a Stand Mixer, knead the dough on medium speed for 6 to 7 minutes.
Transfer the dough to a greased large bowl. Cover it with a cling film and place it in a warm place for bulk fermentation(atleast for 2 hours).
Meanwhile, prepare the butter block(Beurrage).
Take the chilled butter on a flat working surface. Soften a bit by hammering it as shown in Pic 1 and Pic 2.
Place the softened chilled butter on a parchment paper (Pic 3)
Fold the parchment to form an envelope (Pic 4 and Pic 5)
Using a rolling pin, make a neat flat rectangle of around 8inchesx10inches. This will be referred as our enveloped butter as shown in Pic 6 and Pic 7.
After the bulk fermentation(doubled or tripled in size) of the dough punch it gently. Loosely shape the dough into a rectangle and place it on a lined rectangular tray or pan as shown in Pic 8.
Now cover the dough well with cling wrap. Our dough and enveloped butter block is ready to go for an overnight refrigeration as shown in Pic 9.
Refrigerate them.
DAY2
Next day, take out the dough from the refrigerator and place it in the freezer for 15 to 20mins.
Meanwhile, take the butter block out of the refrigerator, hammer it gently with a rolling pin to make its consistency pliable(Butter should still stay chilled).
To check the pliability, run the enveloped butter over the edge of your kitchen counter as shown in Pic 2. It should move easily and freely over the edge and should not tear or crack at all.
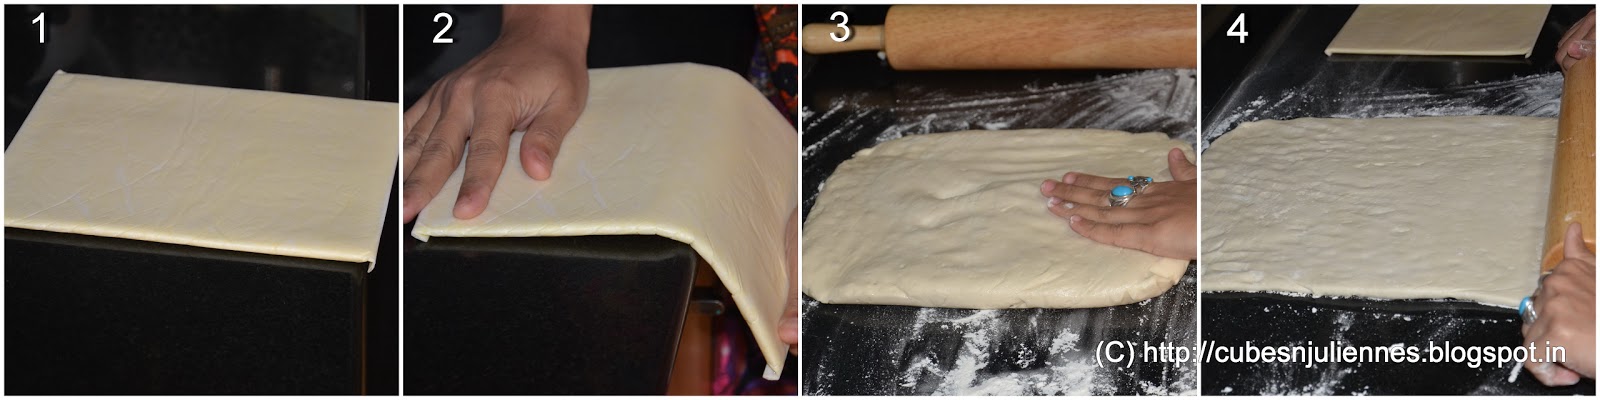
Take out the dough from the freezer onto your working surface. On a lightly floured surface, roll it into a rectangle of 17inches x 11inches as shown in Pic 3 and Pic 4
The most important part to remember is that the pliability and consistency of the enveloped butter block and the dough should be same. Make sure the dough and butter block are chilled before starting the dough lamination(next steps)
Lamination process:
PART1:
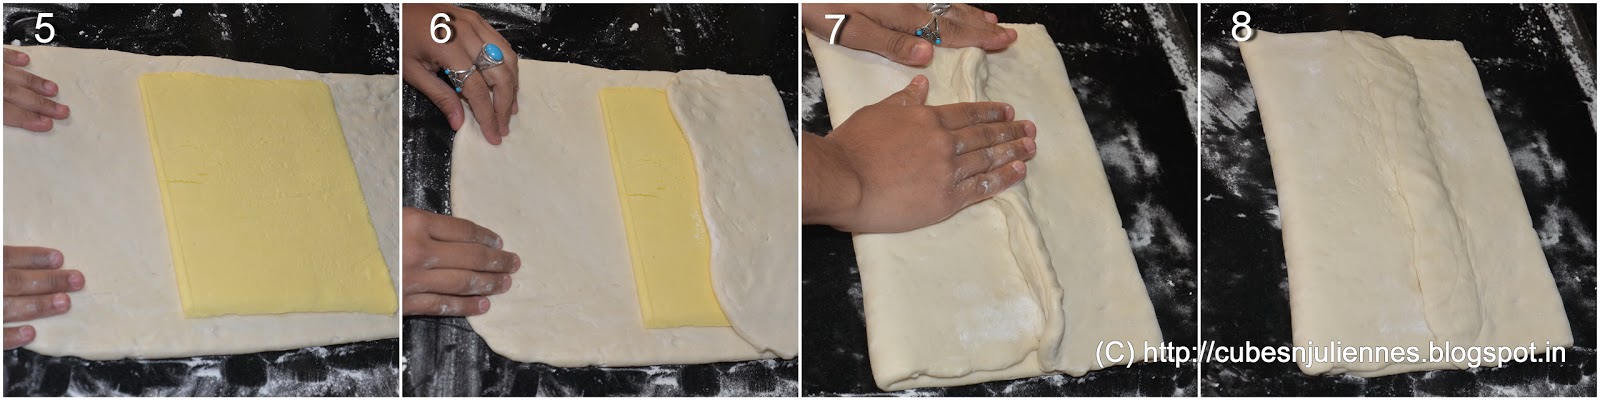
Take out the butter block and remove it from the parchment paper, place it in the center of the rectangular dough such that short side of the butter is in the line of long side of the rolled rectangle dough as shown in Pic 5.
Fold the edges of the dough such that both the ends of the dough meet at the center as shown in Pic 6 and Pic 7.
Seam the edges at the center and the open sides to completely enclose the butter in.
Here our butter is completely locked in the dough as shown in Pic 8.
Gently press the dough to release all the air trapped in if any.
PART2:
Lightly flour the surface, place the dough with the seamed side upwards and short side towards you.
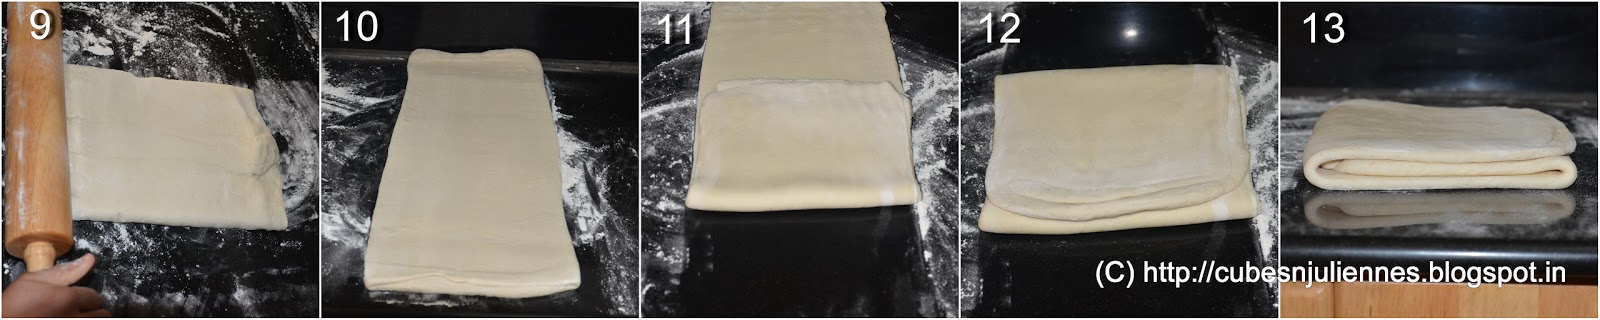
Roll out the dough length-wise till the thickness of the rolled dough reaches around ½ inch.
Do not press the dough too hard or too light while rolling as shown in Pic 9 and Pic 10.
Take the short end of the dough and fold it upto ⅔rd of its length as shown in Pic 11.
Fold the remaining ⅓rd part of the dough over to form a Trifold as shown in Pic 12 and Pic 13.
PART3:

Again lightly flour the surface, place the dough with short side towards you.
Roll out the dough length-wise gently till its thickness reaches ½ inch.
Give another trifold as shown in Pic 16, Pic 17 and Pic 18.
Wrap the dough in cling film and refrigerate for another 30 to 45 minutes.
PART4:
Take out the dough from the refrigerator and remove it from the cling film.
Again lightly flour the surface, place the dough with short side towards you.
Roll out the dough length-wise gently till its thickness reaches ½ inch.
Give another trifold as shown in Pic 16, Pic 17 and Pic 18.
So, at this stage we are done with our 27 layers of lamination.
Wrap the dough in cling film and refrigerate it overnight.
DAY3
Remove the dough from the refrigerator and unwrap it from the cling film.
Place it on a lightly floured surface and very gently hammer it.
Now roll out the dough length-wise with the short side towards you till the dough reaches the thickness of 7mm.
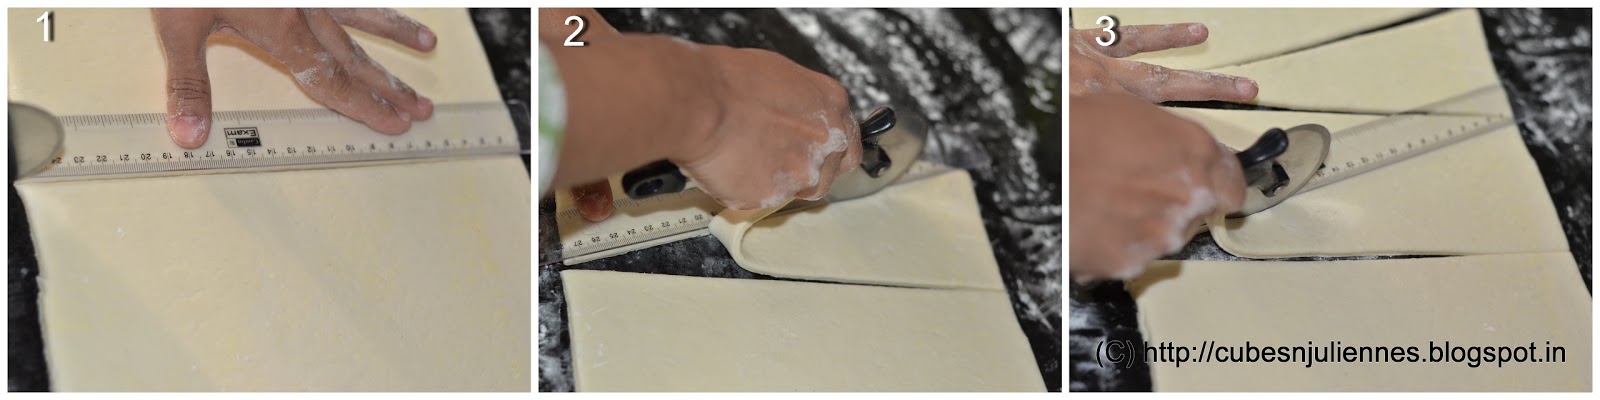
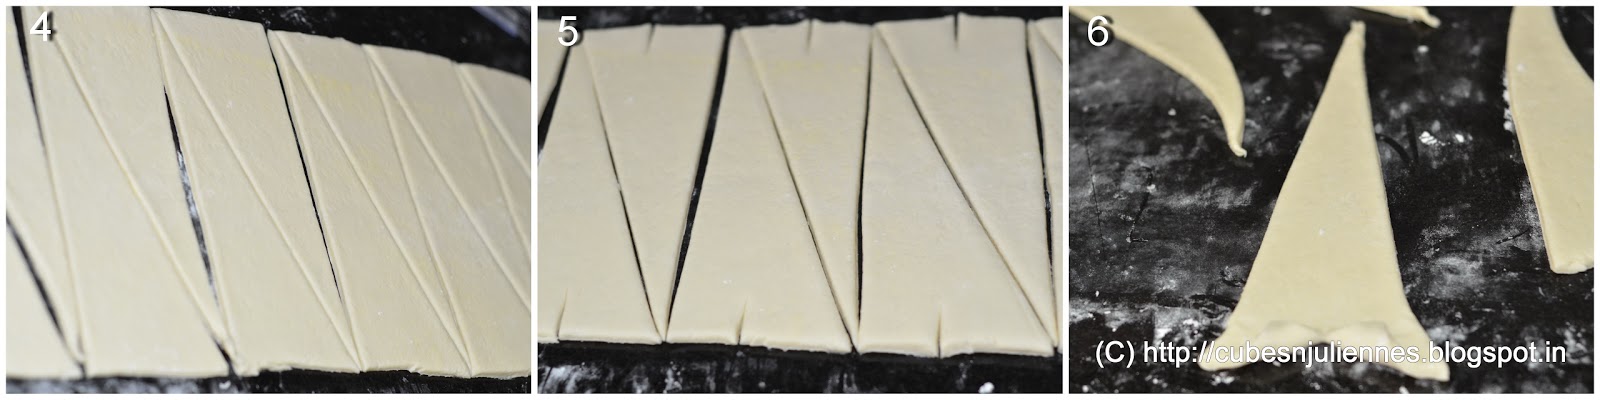
Trim all the sides with the help of a pastry wheel or a sharp knife to make a neat flat rectangle as shown in Pic 1.
Now we have to get back to our geometry basics and need our very old friend called a “Measuring Scale or Ruler”.
With the help of scale start making rectangles with 9cm width and height of the rolled dough. Now cut each rectangle diagonally to divide into 2 triangles. (Pic 2 to Pic 4)
Make a 1 inch slit at the center of each triangles’ base(Pic 5)
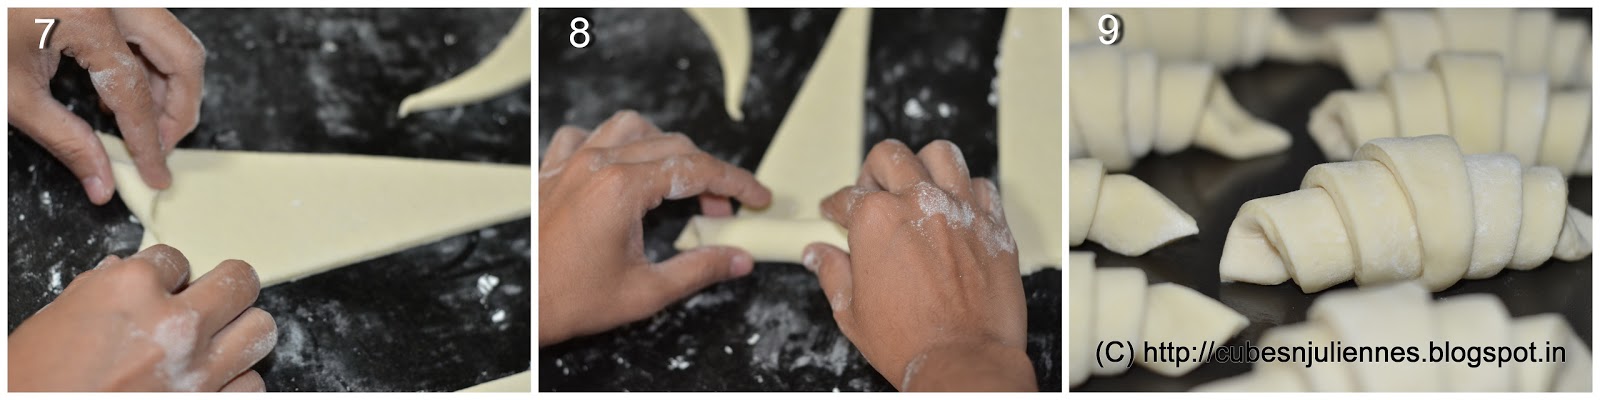
Take one triangle with the slit base towards you. Start rolling from the two slit ends towards the tip of the triangle as shown in Pic 6 to Pic 8.
Repeat the same for all the triangles.
Place the croissants either on a baking sheet or baking tray with seamed tip downwards. Cover loosely with cling wrap and leave it at room temperature or very slightly warm place for proofing for around 2 to 3 hours. Maintain a gap of atleast 2 inches between croissants. Avoid proofing in a very warm place as it may lead all the butter in the layers melt and leak.
After proofing, the croissants will become more fluffy.
Preheat the oven at 210 degrees.
Beat the egg white and water together to form an egg wash.
Just before baking, gently brush the croissants with egg wash. Place the tray with croissants in the oven and bake them for 20 mins or till they are deep golden brown with crispy and flaky texture.
Remove them from the oven and cool them. There you are, ready to enjoy them warm !!
NOTE:-
1. There are several methods of laminating the dough in the making of Croissants but the above one which I have mentioned is what I found to be simple, easy and gives perfect results.
2. If possible, use European butter with 82% FAT percentage to get the best results.


Avin Kohli says
[* Shield plugin marked this comment as "trash". Reason: Failed GASP Bot Filter Test (comment token failure) *]
Delicious. So much effort you have put in explaining the whole process. Hats off????????
Shaista says
Jazakallh Farukh, for this kind information.
Shaista says
Lovely croissant Farrukh. which yeast do you use and where do u get in Bangalore, as i am new to bangalore so no idea. And you also mentioned instant dry yeast in your one recipe, so where I will get it. Thanks for sharing the great recipes.
Farrukh Aziz says
Thanks Shaista, i always use Gloripan instant yeast. it is easily available at Godrej nature's basket or you can order it online 🙂
Bhawna says
Di thanks for your detail recipe..i want to know if it can b made in 2 days. 🙂
Kalpana Trivedi says
tusi great ho farrukhji.
sangeetha pn says
This is remarkable Fahrukh! Excellent
well explained step by step.. clicks r splendid too
V Yel says
Amazingly made French Croissants! The step by step preparation method with detailed images is just great thinking. All food recipes are tricky but desserts are the trickiest to make.
Nisha Shetty says
Farrukh Farrukh Farrukh........<3
Smita says
The croissants look gorgeous! Every step of the process is beautifully demonstrated with pictures. Great job 🙂
Absa Bapunhi says
Simply superb...hats off.