
Today, I shall show you how to make a perfect Punjabi samosa recipe at home each time! I can confidently say this is the best homemade Indian samosas you will ever make.
This post will teach you each thing in detail. Right from making the potato filling to samosa dough, and how to fold and fry them perfectly.
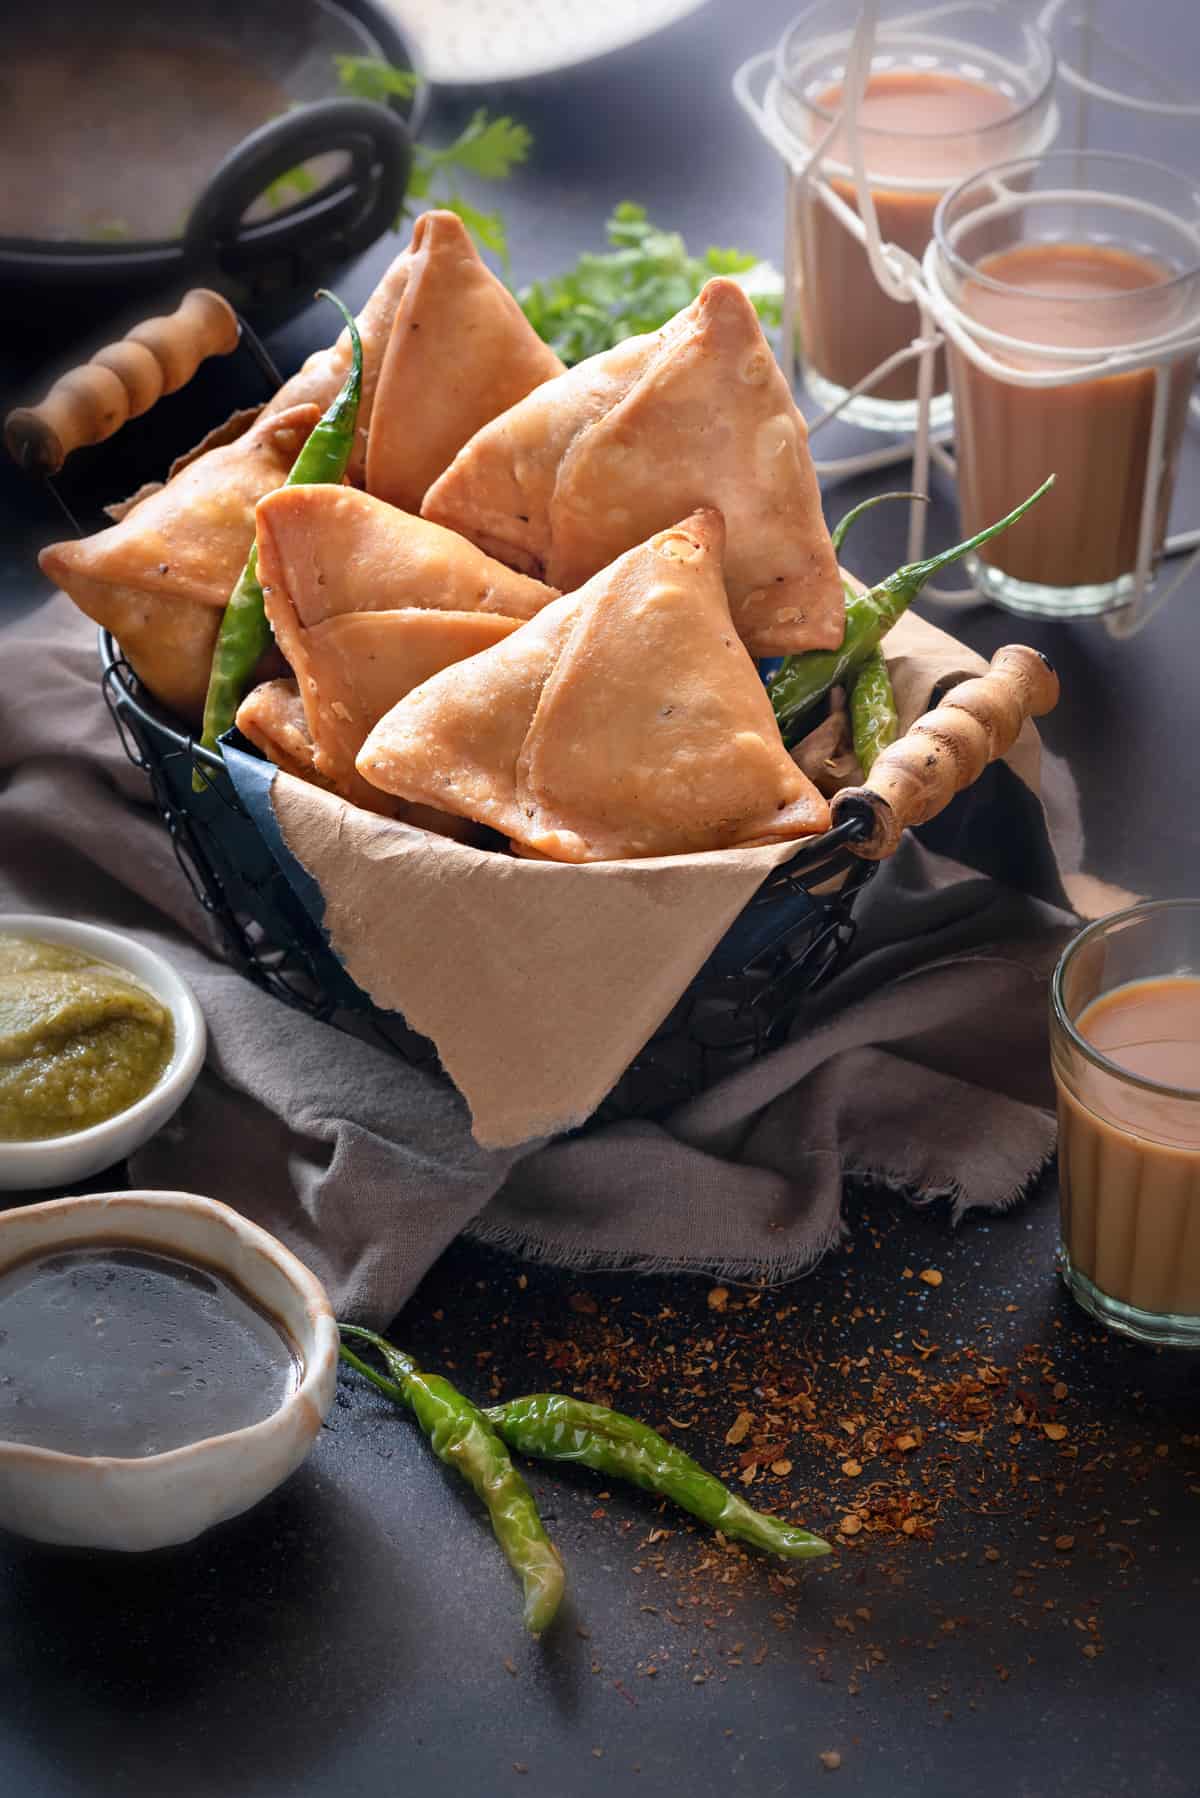
Table of Contents
Samosa - A name that we Indians drool on. I am sure, almost every Indian loves eating it.
You go to any roadside tea stall, or dhabas or to a halwai, these are must on their counter. Because, samosa and chai is a lethal combination that literally nobody can resist eating it.
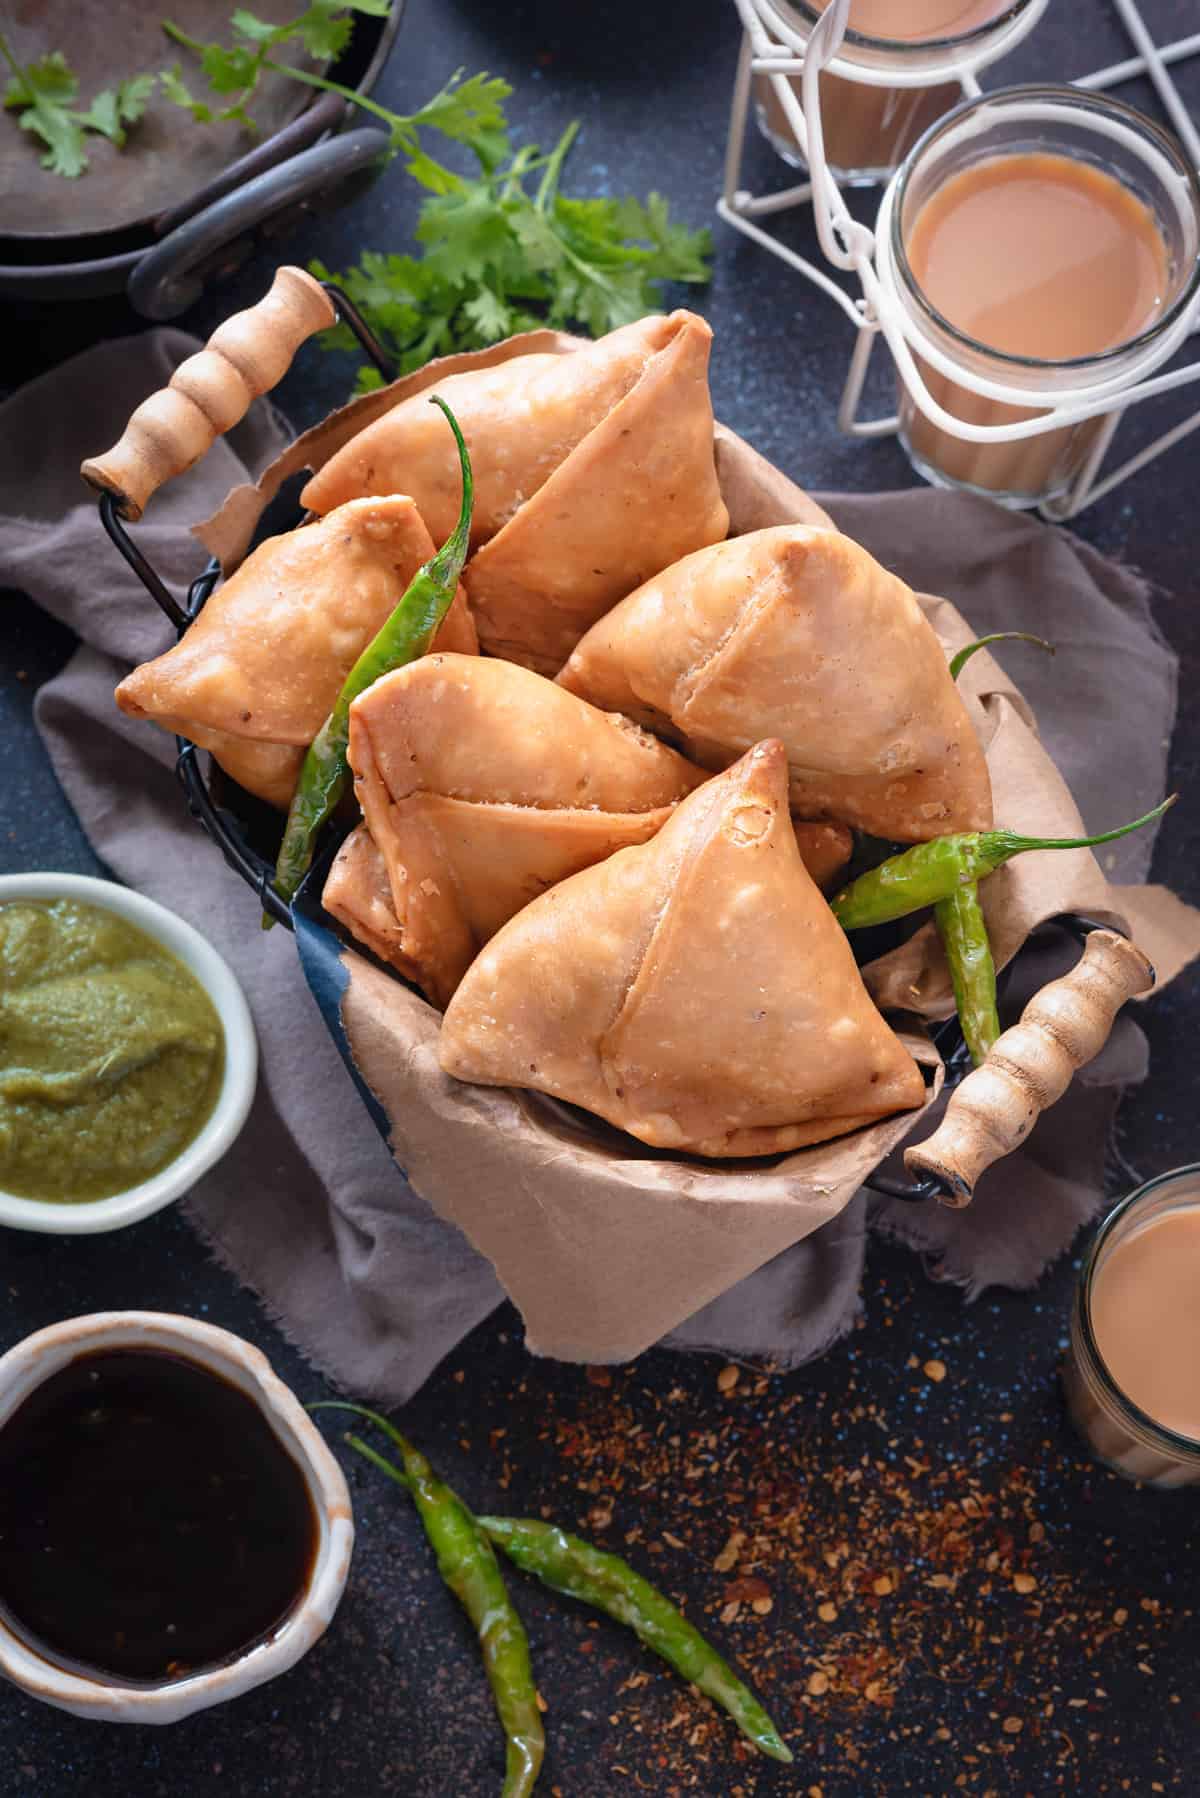
With some nice spicy green chutney, sweet tamarind chutney and those fried green chilies on the side, yummmmm! And, do not forget the garama garam (steaming hot) masala chai to go along.
Though, you may find it in every possible part of the country now a days. But, it is still hard to get that perfect crisp and flaky kinds in all the places.
I am here in Bangalore for almost 15 years. Yet, no street food joint here has amazed me or my palate with a nice samosa as the way it should be. Hard Luck!
Why I am saying this is, because the one we get in my hometown is just unbeatable. Those are the real good Punjabi samosas. I love it so much! That taste still lingers on my tongue, and I miss it so badly.
How can I just sit like that and only dream about those delicious aloo samosas from my favorite shop in my native. It's high time I better make them at home than to just sit and drool. Right?
I know, I am right here. 🙂
So, if you love eating the best flaky samosas with spicy potato and peas filling, then you should try this recipe at home.
I believe, these homemade ones will surely give those store bought samosas a good run for its money. They are so so good in appeal, texture, colour, shape and the most important - it's taste. You just won't look back!
About the Samosa
By now, you must be knowing, how famous this street style Indian delicacy is. Now, let's talk about what is a samosa actually?
Samosa is one of the most popular spicy Indian snack. It is a baked or deep fried crispy and flaky pastry that is stuffed with a choice of filling.
The filling can either be of meat like lamb, chicken, fish. Or it can be filled with potatoes, peas, onions, paneer, cheese, mushrooms, or lentils.
The shapes and types of samosas may differ in every region. While we make it in triangular shape, it can be of half moon shape, a square pocket, moneybag shape (Vegetable Samosa Potli) or in a cone shape.
It is known by various names in different countries. That is, samoosa, shingara, singada, samusa, sambusaq, samboosa are just to name a few.
In many parts of the world, it makes an amazing Iftar snack during the holy month of Ramadan. We love to eat keema samosas for the Iftar.
We grew up thinking that the samosas were originated in India. But, no, it's not!
Some 8 years back, I traveled to Middle Eastern countries for vacation. It was then, when I came to know about the actual origin of samosa. And that is the Middle East!
Samosa was brought to India during the Sultanate rule. At that time, it was made using meat, ghee, onions and nuts only.
Later on, it was modified and became popular as a vegetarian snack across the country.
I also have one variation with the chicken meat, for which you can find the recipe here.
Well, I am least bothered about its birth and birth place. All I know is that a good samosa is my pure love. That's it!
Ingredients
You shall see here that we do not really need too many ingredients for making the samosa recipe. With few basic things you can make this amazing snack at home exactly like the ones we get at street food stalls.
We would be needing :
- Potatoes
- Green peas : fresh or frozen, anything will do.
- Cashew nuts : skip if your are allergic to it.
- Dry mango powder
- Spices : ajwain (carom seeds), cumin seeds, coriander seeds, pomegranate seeds and dry red chilies.
- All purpose flour (maida)
- Ghee or Oil and water
- Salt to taste
Note : You can some green chilies and bit of garam masala powder if you like it. But do not add too much as the real flavor may get lost.
How to Make Samosa
You can boil potatoes in pressure cooker or pot and even in the Instant Pot. Once the potatoes are boiled, let it cool completely. Peel, mash and set it aside.
Making the potato filling
Step by step pictures from 1-10.
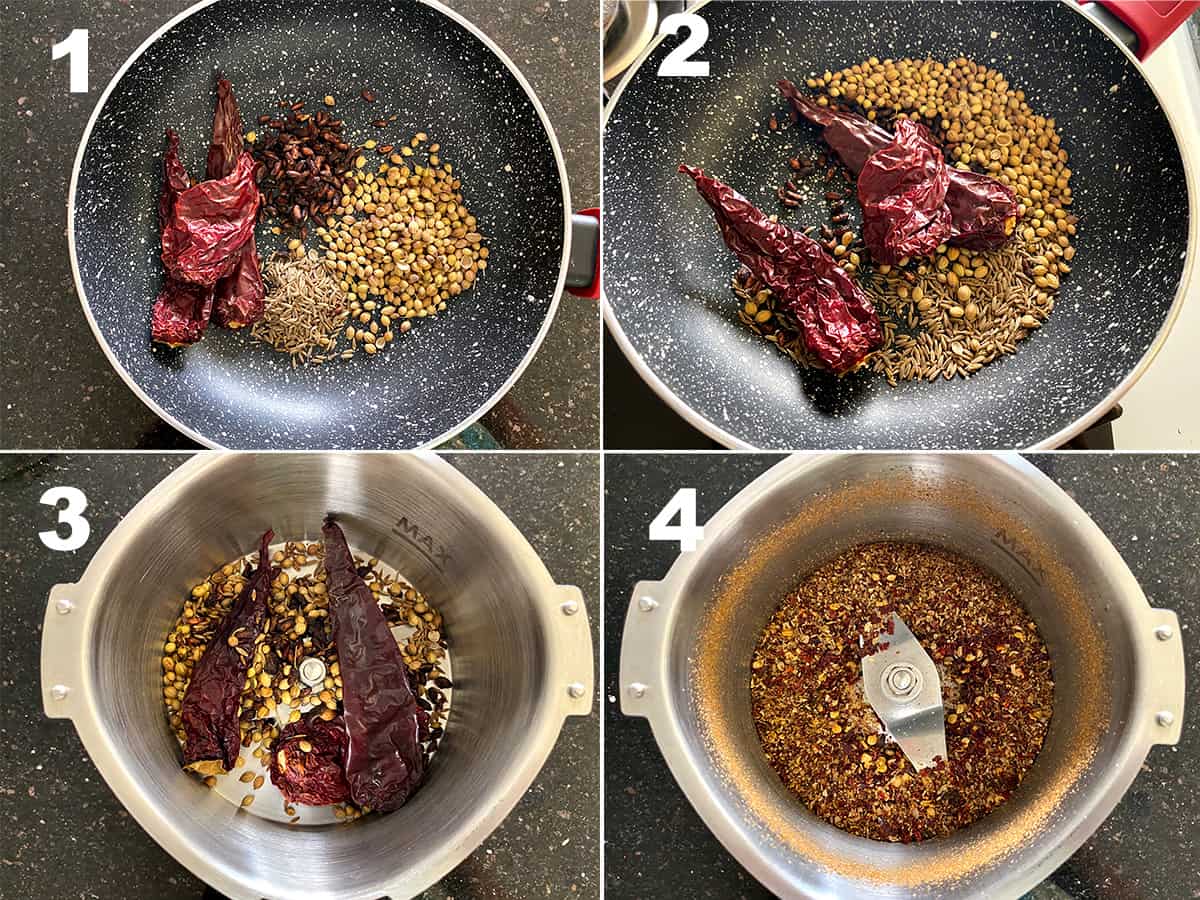
To begin with, in a pan, add coriander seeds, cumin seeds, pomegranate seeds and red chilies. Dry roast until aromatic.
Then, add it to grinder and grind it to a coarse powder.
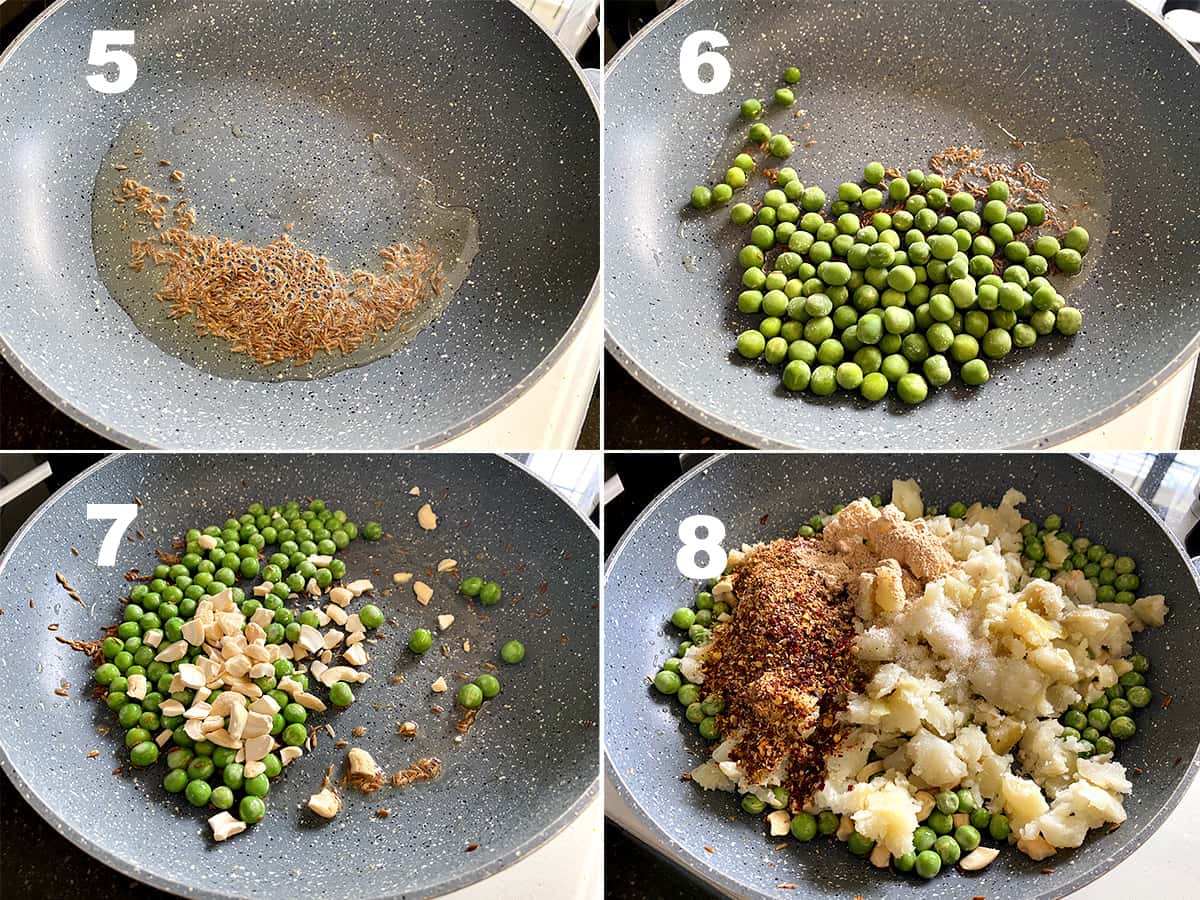
Heat oil in a pan. Add cumin seeds and let it to crackle.
Then, add green peas and sauté it for a minute.
Add broken cashews and toss until just light golden. Do not burn it.
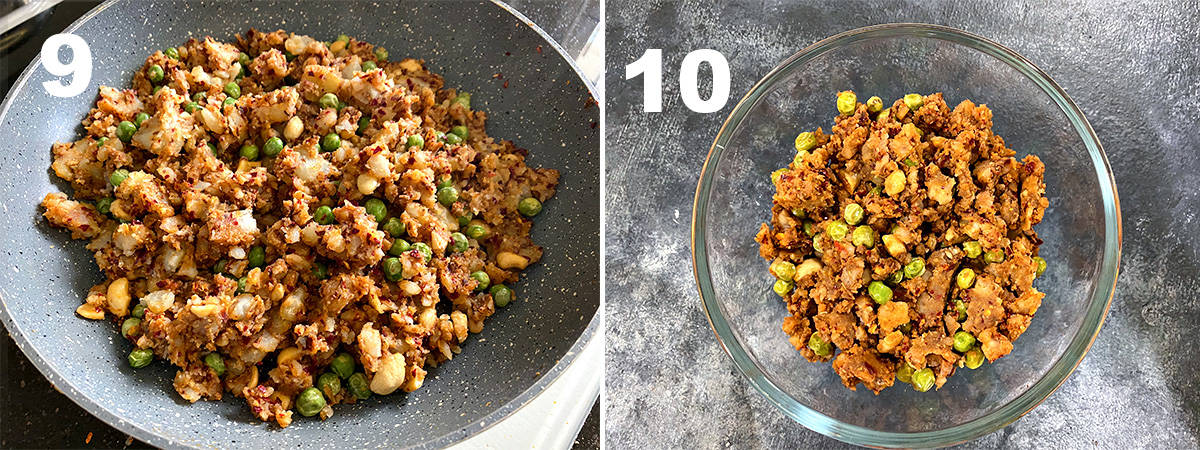
Then, add mashed potatoes, dry mango powder, salt and roasted ground masala powder. Mix well.
Cook for 1 minute and then take it off the heat. Let the mixture cool. Lastly, transfer the filling into a bowl and set it aside.
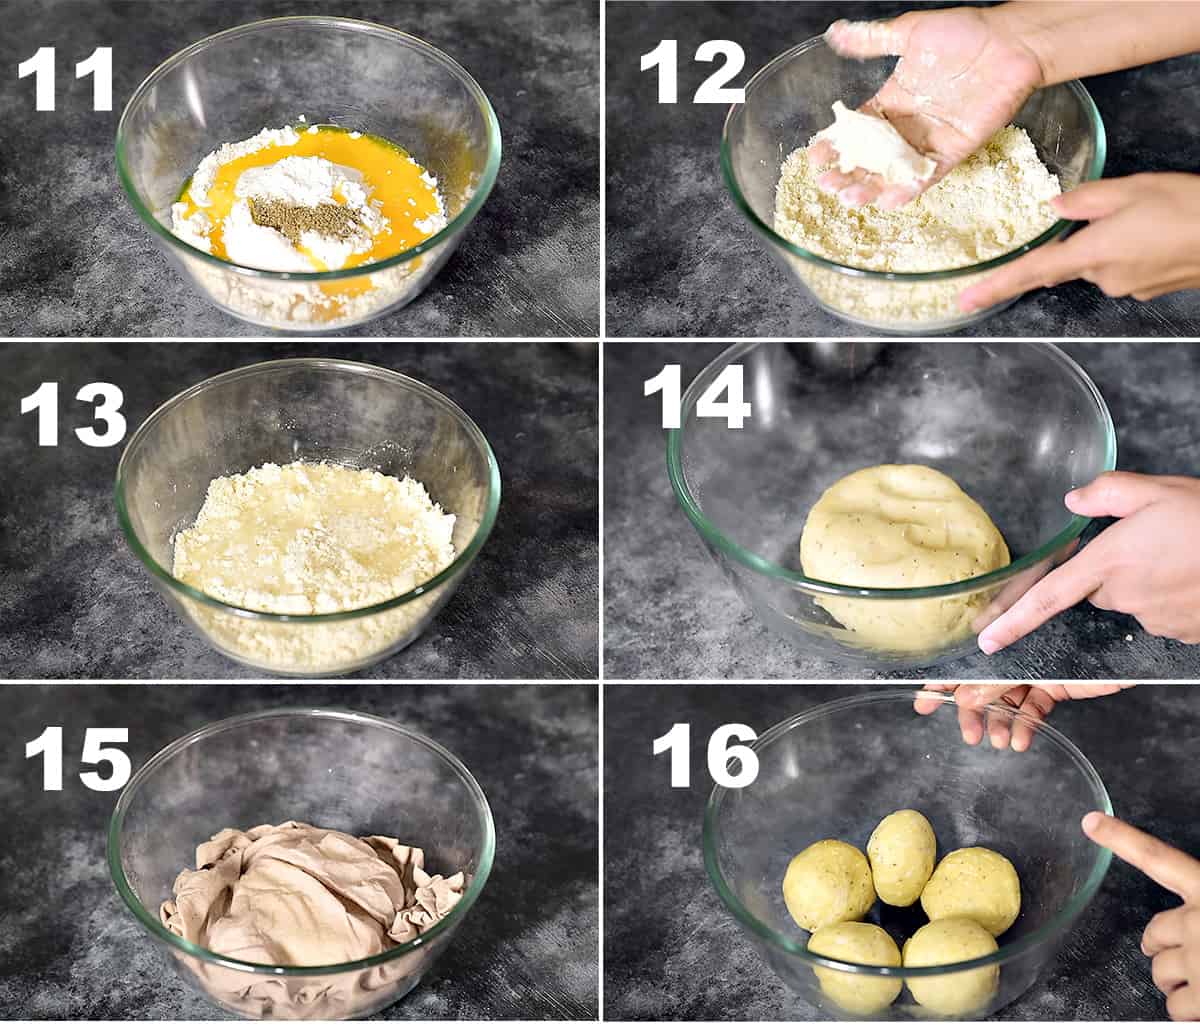
Making the samosa dough
Step by step pictures from 11-16 below.
To begin with, in a large bowl, add flour, ghee or oil, ajwain, and salt.
Using you fingers or palm, start mixing the flour until crumbly. To test it, hold the crumbled flour mixture into your palm such that it should be bound enough to form a chunk. Thats when its ready and you can add water in it to form a dough.
Now, add little water and knead it to a stiff dough.
Cover the dough with a damp cloth and keep it aside for 30 mins.
After resting the dough, knead the dough once again. Divide the dough into equal balls. I made 5 balls in total, and this will give 10 medium samosas.
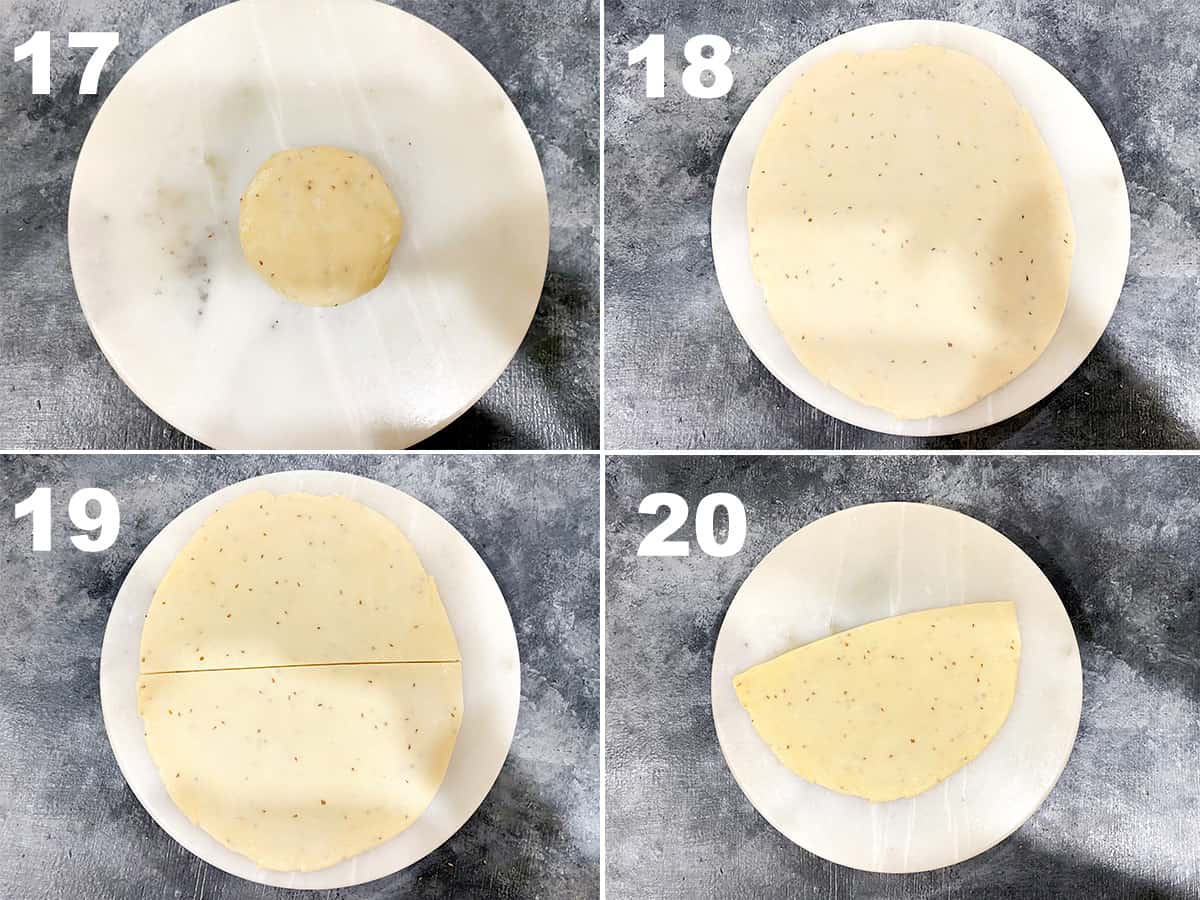
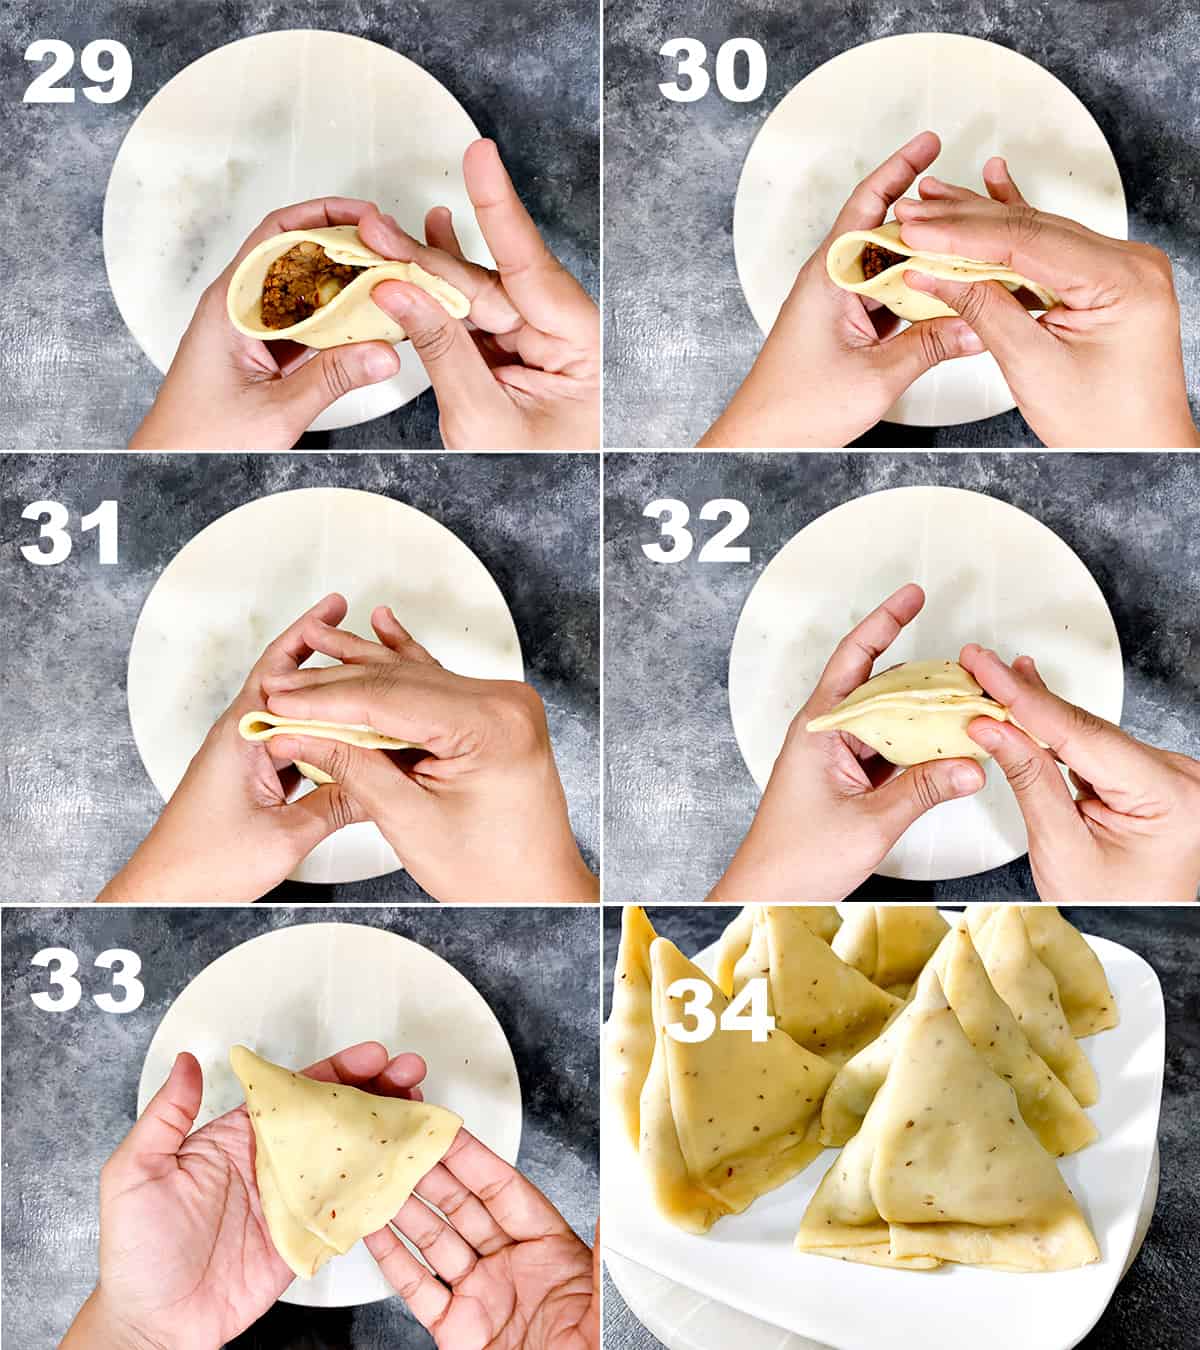
Shaping the samosas
Step by step pictures from 17-34.
Take one ball and roll the dough in oblong shaped disc with the thickness of 3-4 mm.
Now using a knife, divide the rolled disc into 2 semicircles slitting through the centre.
Roll it a bit to stretch the edges. Take one semicircle and apply little water on the straight edge.
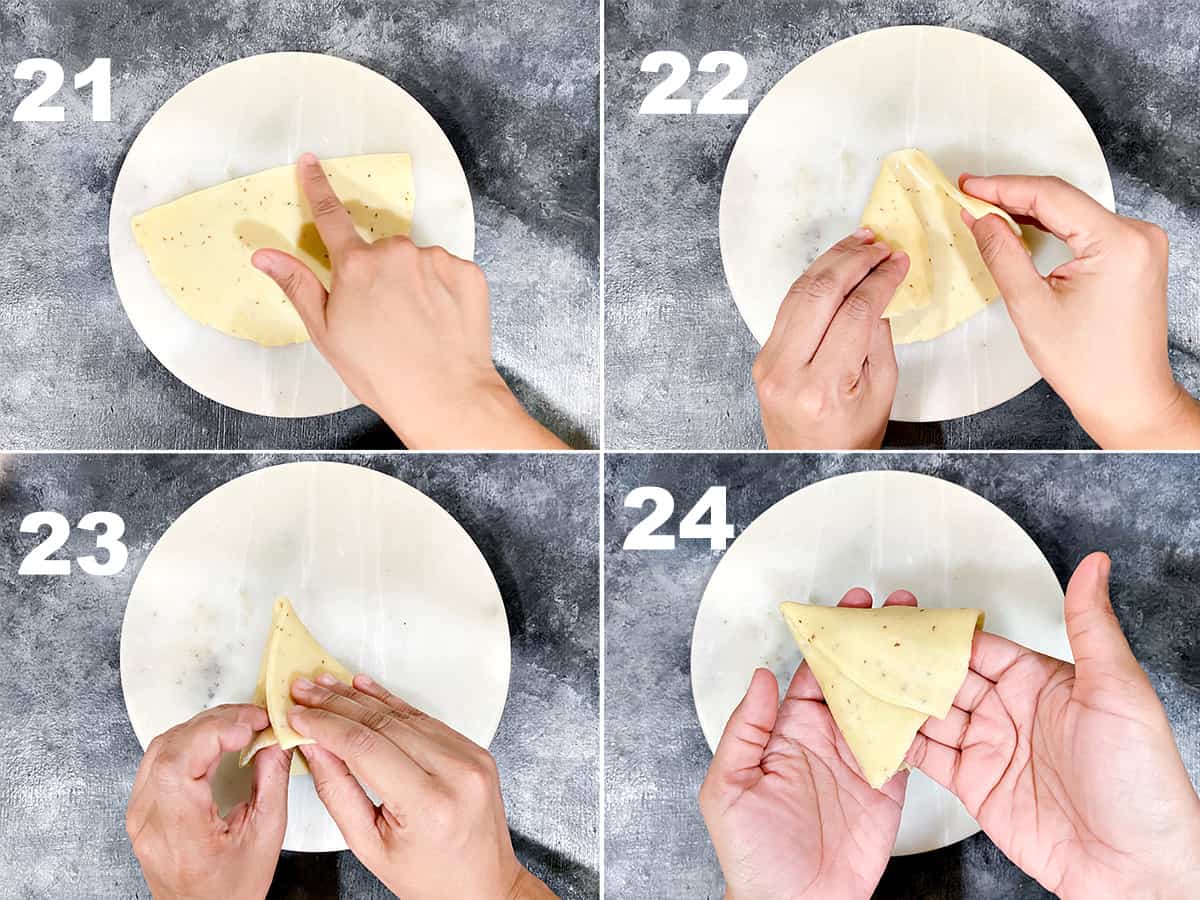
Bring the straight edges together to form a cone. Press the edge and seal it well so that the filling doesn’t ooze out during frying. This is the most important point to take care of.
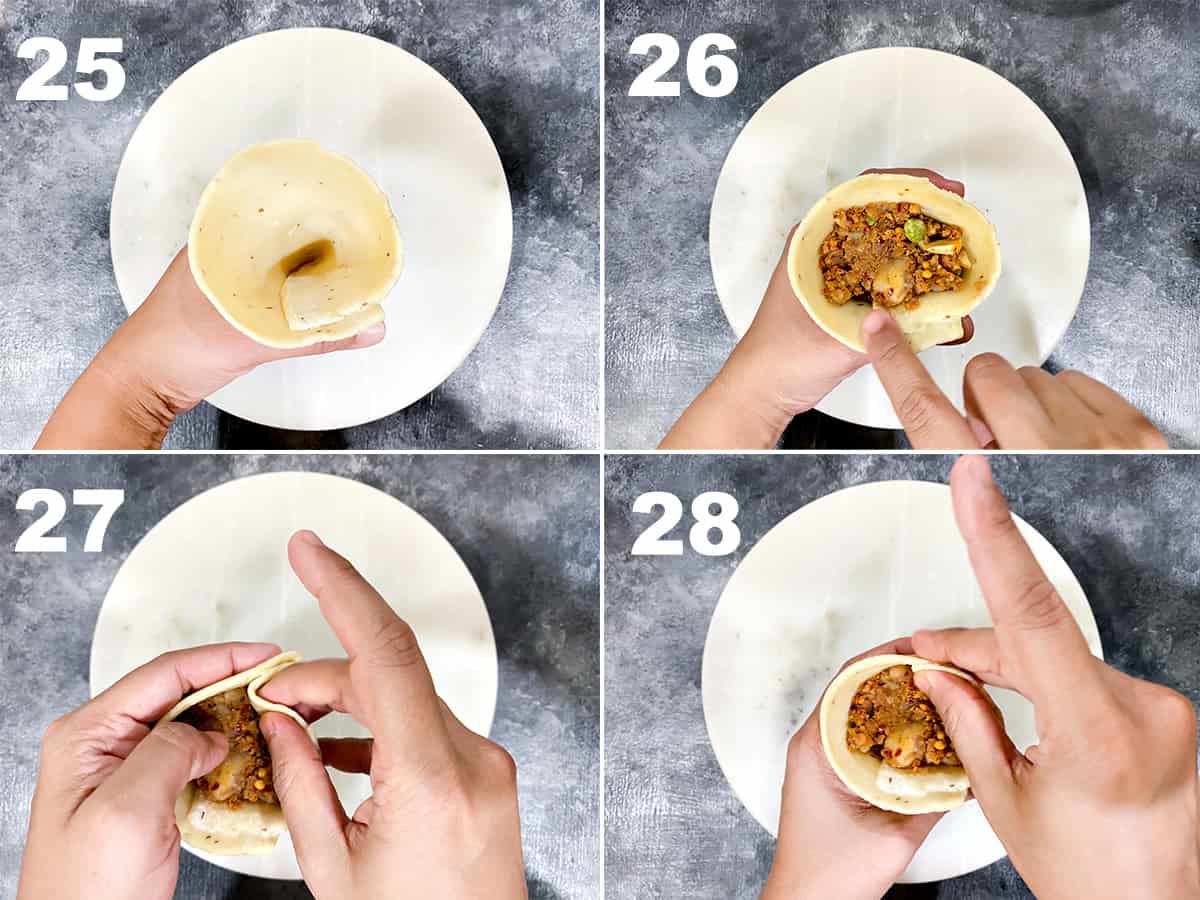
Fill the cone with the prepared potato filling. Then, press the filling slightly to push it down. Apply little water on the inner edges and make one pleat at the centre of the circled edge.
Now, seal the edges very well to form the shape of the samosa.
Repeat the same for the rest of dough and filling.
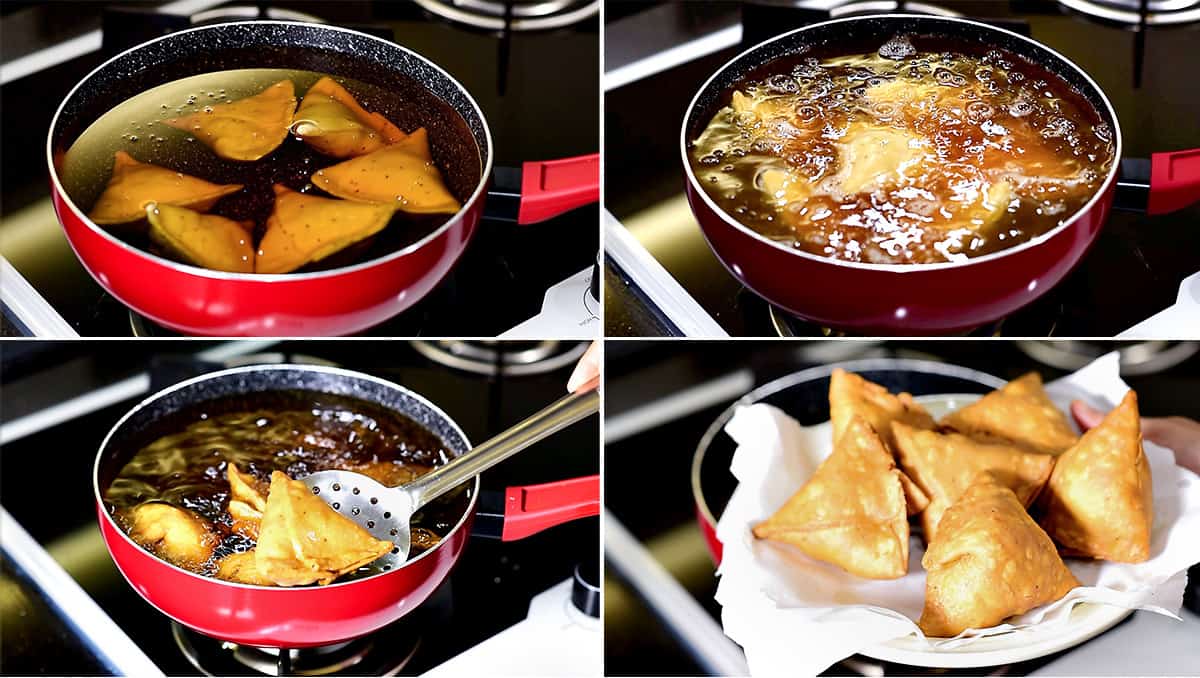
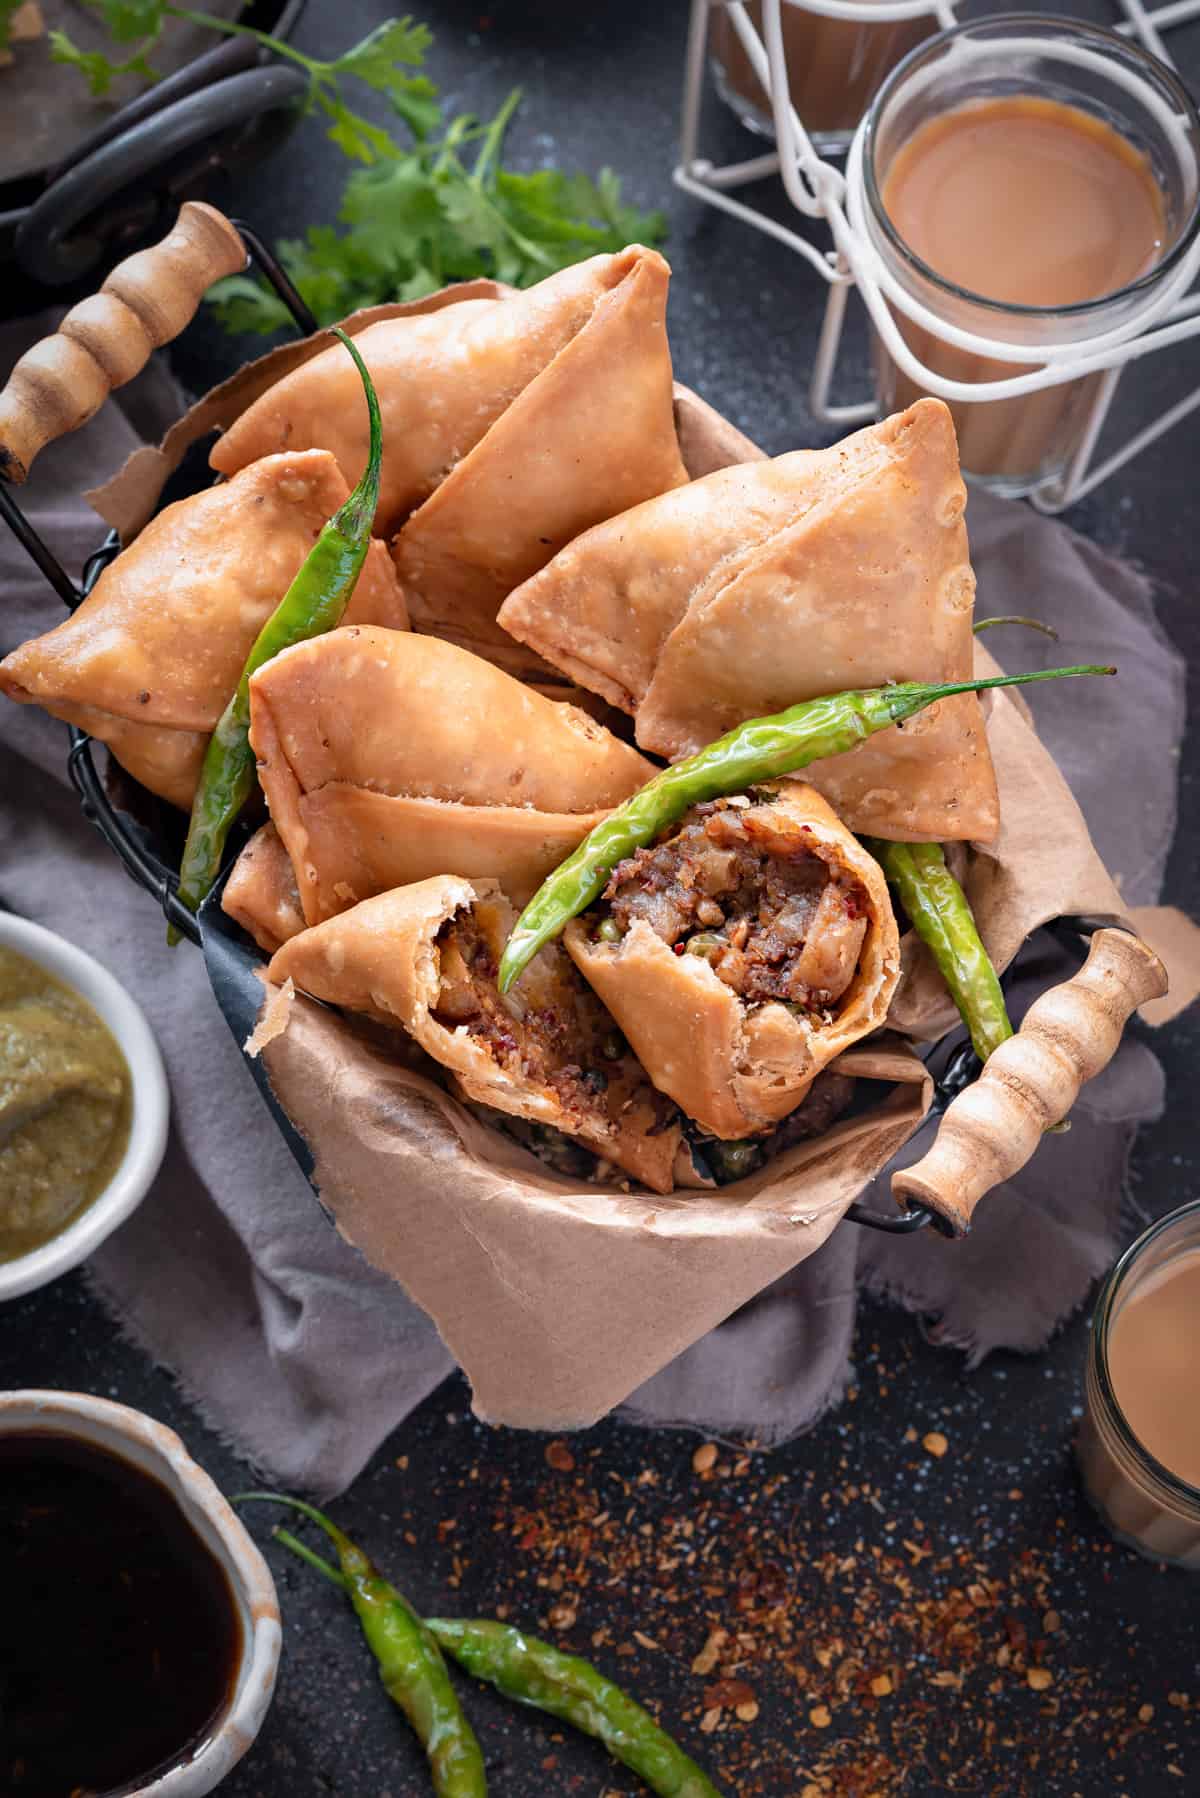
Frying the samosas
Now heat the oil in a deep wok or kadhai. Once the oil is just a little hot, gently drop them in one by one. Do not over crowd the pan while frying.
Keep stirring in between to provide proper heat all around the samosas. Each batch will take around 20-25 mins to fry.
Fry the them until they are golden brown from all sides, crisp and properly cooked within.
Finally, take them out and place on to an absorbent paper.
Note : When frying the next batch, please make sure that the temperature of the oil has come down to just above room temperature and then continue.
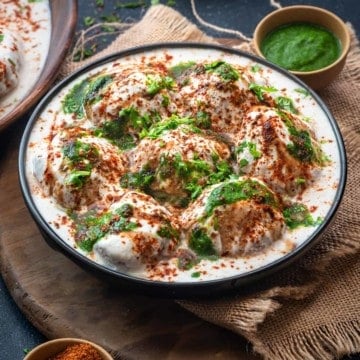
Serve them hot and crisp with your favorite chutneys and chai.
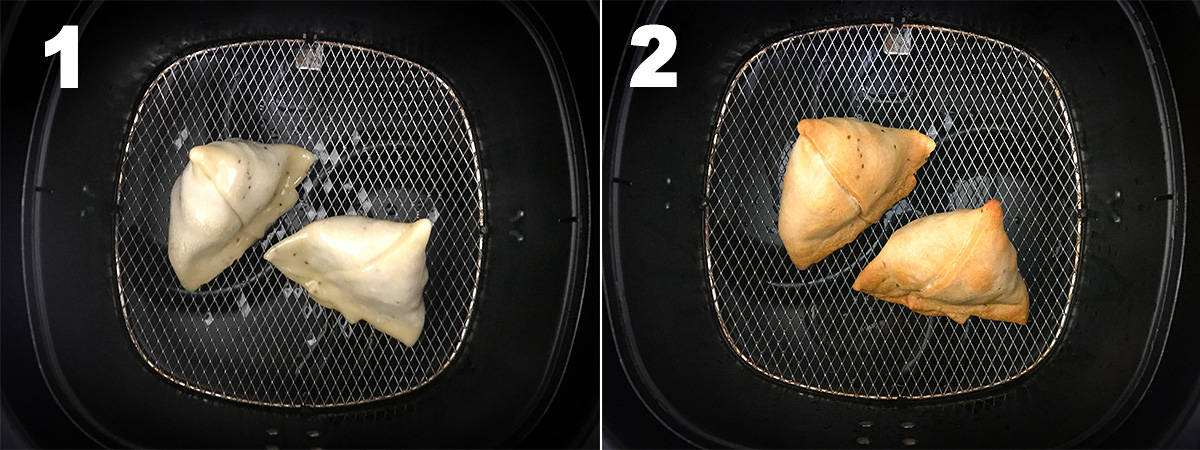
Making it in the Air Fryer
Yes! I have air fried them and trust me it tastes better than the baked ones. Here is how I did it.
Pre-heat the air fryer at 180 degrees for 10 minutes. Line the samosa in the air fryer basket and brush it with oil.
Air fry it for 15-20 minutes or until they are golden and crisp.
Frequently asked questions
Making the samosas using all purpose flour (maida) indeed gives flaky and crispy crust. That said, many people do ask me if they can use whole wheat flour or atta for this recipe.
Yes, you can use it but the whole wheat samosa will have dense crust. So, I would suggest you to use half maida and half atta to make the dough.
Well, if you see here I am sharing the Punjabi samosa recipe with you all. The Punjabi version do not contain onion or garlic. And so is this recipe. 🙂
However, if you like the taste of onion and garlic, then go on ahead, add some and make the filling. That's absolutely fine.
Absolutely! In fact, I always make the filling a day before and store it in clean airtight box. The filling keeps very well in the refrigerator up to 3 days.
Yes, absolutely! The Punjabi samosa recipe makes the use ghee for the dough, you just need to replace ghee with oil and it's vegan!
The only reason that brings this concern is the consistency of the dough.
Adding too much water to flour and then kneading it to a soft dough will make them oily and soft. Knead the tight and stiff dough and the issue will be resolved 🙂 .
AVOID frying samosa in very hot oil on high heat. Yes, very hot oil and high heat frying is the reason for not so crispy samosas and they will also have blisters on their skin.
So, for the best result, always fry the samosas on low heat.
All you need to do is, pre heat the oven at 350 degrees. Place it in the oven and re-heat it for 5-7 minutes.
First of all, in my home, it hardly stays for long. So, I have to make some extra samosas and hide it out of reach from my kids, lol!
Leftovers can be of great use here. You can turn it into lovely chole samosa chaat and enjoy with your family, friends and guests.
I usually make cold samosa sandwich for kid's snack box. Lightly toast the slices of bread with little butter.
Slather the toasted bread with sweet chutney or ketchup and green chutney. Place them in between the slices and its' done 🙂 .
Sometimes, I also top the leftover ones with ragda along with chutneys and enjoy it. It tastes yum!
Yes, you can bake the samosa in the oven!
Preheat the oven at 350 degrees for 15 minutes. Brush them with oil and bake it for 30 minutes on until golden and crisp.
Of course! Fill and shape them, then place them in a single layer on a tray lined with parchment paper. Freeze them for 2 hours until firm.
Then, either pack them in an airtight freezer safe box or in a zip bag and freeze. They stay good upto 6 months.
I have deep fried them straight from the freezer, without thawing it. So, I should say that you really need not thaw them before frying.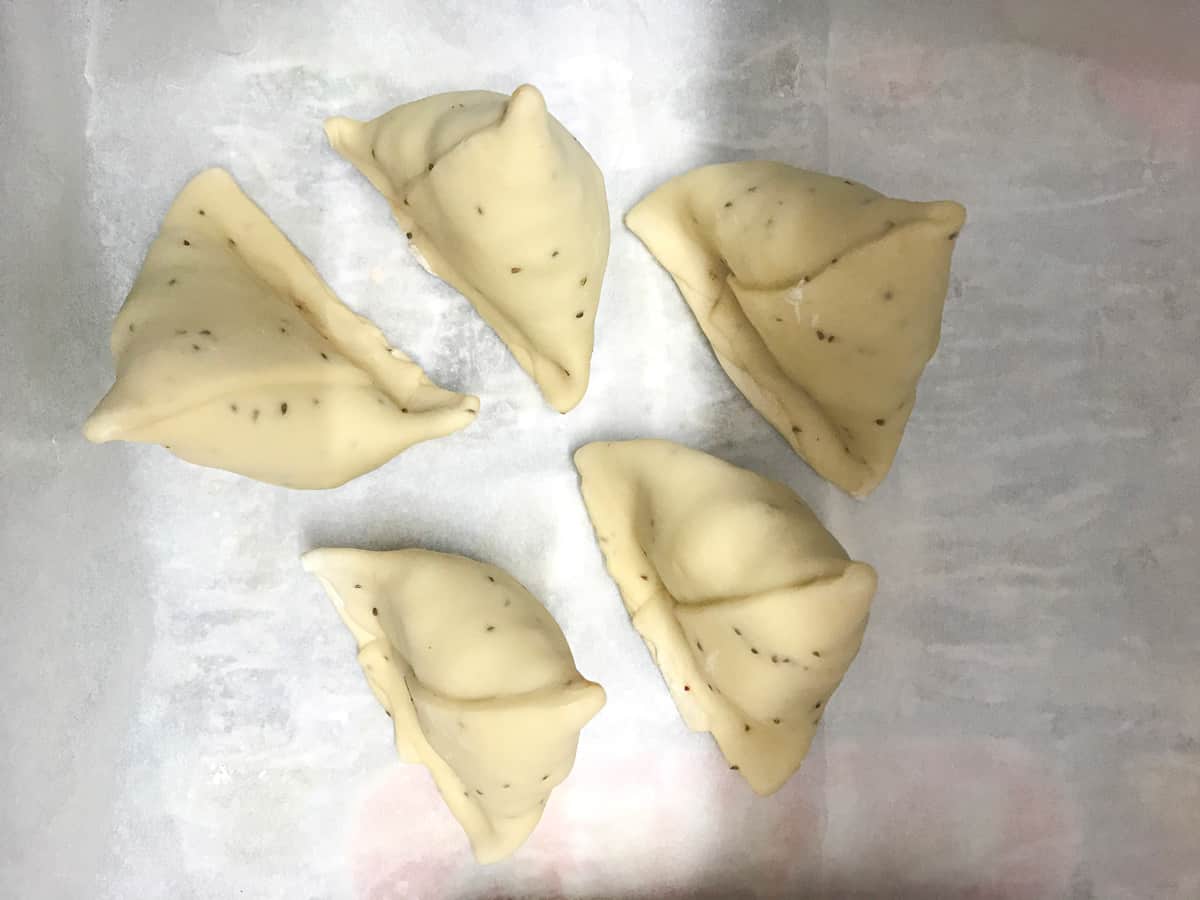
Pro tips in detail
Many people think that making the samosa at home is tough. And with this fear, they won't even give it a try.
I would say, it is not as hard as you think. That said, you need to keep few things in mind to get the perfect result every time.
And, if you follow these few main points, I am sure, you will master it soon.
For the dough
1. First and foremost point here to keep in mind is the flour to fat ratio. For every one cup of flour thats is 125 grams, always use 2 tablespoons of oil or melted ghee thats comes to 30 ml.
So, the very simple ratio that you can keep in mind is for 1 kg of flour always use only 240 ml of oil or melted ghee.
2. The another main point to follow is, the mixing of oil or ghee in flour. After adding the fat to the flour, always rub the flour for good 2-3 minutes using your fingers or palm.
The flour mixture should be crumbly. Now, to check the right consistency, hold some crumbled flour into your palm and close it to form a fist. The flour mixture should hold that closed fist shape.
3. To knead the dough, add little water and then knead. Here, the dough do not require too much water. For 1 cup of flour, 3 tablespoons of water is perfect or max 4 tablespoons water, that's it.
4. Do not over work on the dough and the consistency should be tight and firm. We do not want the soft dough here, it should be hard.
5. Always cover the dough with a damp kitchen towel. Let the dough rest for 30 minutes. Do not skip on this step.
6. Never ever use dry flour to roll the dough. Only if needed, apply little oil and then start rolling it.
7. Always roll the dough evenly, it should not be too thin or too thick. The 3 mm thickness of rolled dough works the best.
The thick rolled dough will take longer time to cook and very thinly rolled dough may break while filling or while folding.
While Frying the samosa
Here is the another most important point to follow. Always, fry the samosa on low heat. The oil should neither be too hot nor medium or cold.
The oil should be warm, a little above the room temperature. Once you slide in the samosas, you should see the sizzle after 40-50 seconds. Thats the ideal temperature of the oil.
Further, always fry the samosa in batches. When the one batch of frying is done, wait for some time before adding the next batch.
Please be sure to let temperature of the oil come down to warm, then fry the next batch.
Moreover, frying them in hot oil on high heat will leave the samosa crust uncooked within. Also, you will see lot of blisters or bubbles on the crust. So, say a BIG NO to hot oil here!
Storage
The leftover fried samosas stays well on a counter for a day.
If you want to store it little longer, then just place them in clean airtight container and refrigerate. In refrigerator, they stay well upto 3 days.
More tasty snacks ideas for you
If you made my recipe for Samosa, please let me know how it turned out for you! I'd love to hear through your comments and ratings below.
If you are looking for more delicious and easy recipes delivered straight to your inbox, you can sign up for my email newsletter.
You can also follow me on Pinterest, Instagram or Facebook to see more of my kitchen creations.
This post has been updated from the archives, it was first published in November 2015.

Indian Punjabi Samosa Recipe
Watch the Video
Ingredients
Dry Roast and grind to a coarse powder
- 1 tablespoon Coriander Seeds
- 1 teaspoon Cumin Seeds
- 1 teaspoon Anardana (Dried Pomegranate Seeds)
- 3 Dried Red Chilies
For Potato Filling
- 1 tablespoon Oil
- ½ teaspoon Cumin Seeds
- ½ cup Green Peas
- 3 tablespoons Cashew Nuts (roughly broken)
- 2.5 cups Boiled Potatoes (roughly mashed)
- 1 teaspoon Dry Mango Powder (Amchur)
- Salt to taste
For the dough
- 2 cups All-Purpose Flour / Maida
- 4 tablespoons Ghee or Oil
- 1 teaspoon Ajwain (Carom Seeds)
- Salt to taste
- 6 tablespoons Water to knead the dough
Other ingredients
- Oil (for frying the samosas)
Instructions
- You can boil potatoes in pressure cooker or pot and even in the Instant Pot.Note : 7-8 whistles on high heat with natural pressure release for pressure cooker method on stove top. 10 minutes on 'High' pressure in Instant Pot with natural pressure release.
- Once the potatoes are boiled, let it cool completely. Peel, mash and set it aside.
Preparation of the masala powder
- In a pan, add coriander seeds, cumin seeds, pomegranate seeds and red chilies. Dry roast until aromatic.
- Add it to grinder and grind it to a coarse powder.
Make the potato filling
- Heat oil in a pan. Add cumin seeds and let it to crackle.
- Then, add green peas and sauté it for a minute.
- Add broken cashews and toss until just light golden. Do not burn it.
- Now, add mashed potatoes, amchur, salt and roasted ground masala powder. Mix well.
- Cook for 1 minute and take it off the heat. Let the mixture cool.
Making the samosa dough
- In a large bowl, add flour, ghee or oil, ajwain, and salt.
- Using you fingers or palm, start mixing the flour until crumbly.
- To test it, hold the crumbled flour mixture into your palm such that it should be bound enough to form a chunk. Thats when its ready and you can add water in it to form a dough.
- Now, add little water and knead it to a stiff dough.
- Cover the dough with a damp cloth and keep it aside for 30 mins.
Rolling the dough
- After resting the dough, give it a good knead.
- Divide the dough into equal balls. I made 5 balls in total, and this will give 10 medium samosas.
- Take one ball and roll the dough in oblong shaped disc with the thickness of 3-4 mm.
- Now using a knife, divide the rolled disc into 2 semicircles slitting through the centre. Roll it a bit to stretch the edges.
- Take one semicircle in hand, apply little water on the straight edge.
To fold and fry the samosa
- Bring the straight edges together to form a cone. Press the edge and seal it well so that the filling doesn’t ooze out during frying. This is the most important point to take care of.
- Fill the cone with the prepared potato filling. Then, gently press the filling slightly to push it down.
- Apply little water on the inner edges and make one pleat at the centre of the circled edge.
- Seal the edges very well to form the shape of the samosa.
- Repeat the same for the rest of dough and filling.
- Heat the oil in a deep pan or kadhai.
- Once the oil is just a little hot, gently drop in the samosas one by one.
- Do not over crowd the pan while frying.
- Keep stirring in between to provide proper heat all around the samosas. Each batch will take around 20-25 mins to fry.
- Fry the them until they are brown from all sides, crisp and properly cooked within.
- Take them out and place them on to absorbent paper.
- Serve hot and crisp samosas with your favorite chutneys and chai.
- When frying the next batch, please make sure that the temperature of the oil has come down to just above room temperature and then continue.

Ramlat Auwal umar says
Thanks alot
Farrukh Aziz says
You are very welcome Ramlat.
Century Foods says
Samosa preparation was explained in very simple and easy manner; making one to go for preparation straight away.
Farrukh Aziz says
Thank you very much 🙂 .
Sheela says
Great keepers recipe. Very helpful tips and step by step instructions. My samosas came out so good. Thanks for sharing !
Leena Bose says
Thank you for recipe. I tried making samosas for the first time and it came out well with all the tips and videos.
Farrukh Aziz says
HI Leena,
You are very welcome 🙂
I am glad it came well, happy for you.
Regards
Farrukh
Sophie says
I made them today according to your recipe. Wow! Heavenly taste! Thank you very much. I finally can make Samosa!
Sophie says
Thank you very much for sharing your wonderful recipe. I learn so much from you. This is the most detailed recipe I have come across. I have a question: Can i cook without pomegranate seeds since I can not find them here. Thank you again.
Farrukh Aziz says
Hello Sophie,
Thank you very much, am really glad to know you loved the recipe very much. 🙂
If pomegranate seeds are not available, just skip them, or if available and you can add little bit of dry mango powder instead, will solve the purpose. I hope that helps. 🙂
Rozemarijn Corthals says
Hi Farrukh,
Thanks for sharing all your great recipies. I am a big fan of them! I am wondering if there is a glutenfree alternative for the samosadough?
Regards Rose
Farrukh Aziz says
Hi Rose,
Unfortunately, the gluten free alternative for samosa dough won't give you the required taste and crunch. However, you can use, either of the one or mix of these flowers - Rice flour, tapioca flour, soy flour or potato flour.